1992 Typhoon 0546 rebuild

qbnkiller

Conflaguration Specialist
Re: 1992 Typhoon 0539 rebuild

Re: 1992 Typhoon 0539 rebuild

I would just see ifyou can get someone at a local machineshop make you a custom-thickness one. It isn't a very complicated part, and as for it causing any kind of problems, none at all. Just make sure the fasteners are good and tight (Stage 8 fasteners are pretty good)
 

Quickstop [UK]

Combating adversyty.
Re: 1992 Typhoon 0539 rebuild

Re: 1992 Typhoon 0539 rebuild

Got some more stuff done today.

Replaced the fuel tank with the new walbro and also checked out the ractronix assembly - really easy.

DSC00025.jpg


Getting the fuel tank up into the bed was a pain though. If anyone was to do this more than once then it is worth getting some braided hoses or longer lines so you don't have the dicking around under there. What a PITA.

I also did the lowering blocks but hit a snag - the pin holding the leaf springs together doesn't have a head so how do you get it out of the springs? I didn't want to grind it off but I may very well have to do just that.

I thought a bit about the geometry of the blocks and the pinion angle and realised that if you put on the setback plates ABOVE the wedge then the blocks on top of that then at best you won't have moved the wheels forward. At worst, the wheel setup is forward even more than if you just lifted it. I might draw a diagram to explain what I mean.

DSC00026.jpg


DSC00089.jpg


The blocks would go straight up rather than push the trans forward to the amount of 2.5 cos (4 degrees, the amount of the stock block) inches. This probably negates the 1/2 axle setback plates. I am going to have to get the bolt out. Anyone been aggressive with the spring bolt?

I also had a little fun on the trans and ground off one of the ears.

DSC00027.jpg


I had a look at the 80E harness as well and think I can get that wiried in pretty quick. I just need the turbo spacer, and all the pulleys and idlers. Hoping to get the engine in soon.

Irritatingly, after Tooky said not to dismantle the tensioner, I was going to just sand it and freshen it up. I drove for 5 minutes and the damn thing fell apart so I am in for a new one after all.

Getting there :)
 

Quickstop [UK]

Combating adversyty.
Re: 1992 Typhoon 0539 rebuild

Re: 1992 Typhoon 0539 rebuild

Well another busy day with seemingly not much achieved but some progress here and there and more importantly, some issues discovered that I need to resolve.

Some pics...

What is this connector on the PCS controller? I think it is the speen control and is not needed - anyone able to confirm this please?
DSC00046.jpg


DSC00045.jpg


My 4L80E has a new home

DSC00042.jpg


However, the install is not without it's issues.

The tubular cross member has holes on the passenger side of the truck....

DSC000401.jpg


But on the driver side, the holes are way too big...

DSC00039.jpg


And how are you supposed to get access to the nut/bolt - do i have to grind the frame?

DSC00041.jpg


The ears seem to stick out a long way on the 80 here (pass side)

DSC00043.jpg


also on the dvr side...The brass nut is on the M10 bolt that George Blake included in his kit with the spacer, but the engine mount holes are 3/8 16 UNC - do people just swap the bolt out? It's about 6 inches long so I may just get some studding as I can't find any that size very easily.

DSC00044.jpg


I couldn't resist putting on the new wheels I bought from Attackdog 2 years agp - they've never been on the truck.

DSC00037.jpg


DSC00038.jpg


I think they look pretty slick.

ISSUES:

Holes for 4L80E cross member? Anyone deal with that?
Do I cut a hole in the body and use a weather proof grommet for the extra wiring harness? Can someone that has done this without cutting just explain/show me what they did?

George Blakes pics of the shifter linkage at the trans have disappeared. Can someone take some pics?

I am missing the shifter linkage arm to the transmission - I have the cable, not the arm at the trans that the linkage connects to. Does anyone have one they can ship to 06607?
 

Quickstop [UK]

Combating adversyty.
Re: 1992 Typhoon 0539 rebuild

Re: 1992 Typhoon 0539 rebuild

I'm a dik - the trans cross member goes OVER the chassis - went in with a few wriggles in the end. - thanks to Jeff Scott for that as well as the info on the grommet/cables.

Detroit Turbo sell the link. All I need now for the trans is someone to post some pics of their correctly installed linkage at the trans end and the shifter end. I'm guessing otherwise. Can anyone help me out?

Looks like the PCS computer is going under the cup holders at the front.

The other thing I am doing is installing some RS 232 connectors in the tray in place of the cigarette lighters. Who needs them anyway? That way I won't have data cables all over the place. Should be pretty neat when it's done.
 

eviltwin

"junkyard syclone"
Re: 1992 Typhoon 0539 rebuild

Re: 1992 Typhoon 0539 rebuild

the 4l80e has two speed sensors. one in the front and one in the back. If your has a block off on the rear one you can connect to the speed sensor on the t-case.
 

Quickstop [UK]

Combating adversyty.
Re: 1992 Typhoon 0539 rebuild

Re: 1992 Typhoon 0539 rebuild

the 4l80e has two speed sensors. one in the front and one in the back. If your has a block off on the rear one you can connect to the speed sensor on the t-case.

Thanks mate - I am guessing you are referring to the orange connector that doesn't appear to have a connection that I posted at the top of the thread. Thanks! I'll check it out.
 

Syclone1639

New member
Re: 1992 Typhoon 0539 rebuild

Re: 1992 Typhoon 0539 rebuild

Got some more stuff done today.

Replaced the fuel tank with the new walbro and also checked out the ractronix assembly - really easy.

DSC00025.jpg


Getting the fuel tank up into the bed was a pain though. If anyone was to do this more than once then it is worth getting some braided hoses or longer lines so you don't have the dicking around under there. What a PITA.

I also did the lowering blocks but hit a snag - the pin holding the leaf springs together doesn't have a head so how do you get it out of the springs? I didn't want to grind it off but I may very well have to do just that.

I thought a bit about the geometry of the blocks and the pinion angle and realised that if you put on the setback plates ABOVE the wedge then the blocks on top of that then at best you won't have moved the wheels forward. At worst, the wheel setup is forward even more than if you just lifted it. I might draw a diagram to explain what I mean.

DSC00026.jpg


DSC00089.jpg


The blocks would go straight up rather than push the trans forward to the amount of 2.5 cos (4 degrees, the amount of the stock block) inches. This probably negates the 1/2 axle setback plates. I am going to have to get the bolt out. Anyone been aggressive with the spring bolt?

I also had a little fun on the trans and ground off one of the ears.

DSC00027.jpg


I had a look at the 80E harness as well and think I can get that wiried in pretty quick. I just need the turbo spacer, and all the pulleys and idlers. Hoping to get the engine in soon.

Irritatingly, after Tooky said not to dismantle the tensioner, I was going to just sand it and freshen it up. I drove for 5 minutes and the damn thing fell apart so I am in for a new one after all.

Getting there :)

I removed those wedges and found that the geometry is just fine. I didn't like the look of the wheels being off center.
 

bezerk

New member
Re: 1992 Typhoon 0539 rebuild

Re: 1992 Typhoon 0539 rebuild

I removed those wedges and found that the geometry is just fine. I didn't like the look of the wheels being off center.

how did you remove those? i was under the truck i tried to take em off, but it looks like they were klinged in there or how ever you like to call it.
how did you take em off?
 

Quickstop [UK]

Combating adversyty.
Re: 1992 Typhoon 0539 rebuild

Re: 1992 Typhoon 0539 rebuild

the bolts on my truck appear to be rounded - not allen keyed or anything, just some round bolts with no grip on them so I am going to take an angle grinder (anyone see a theme here) and grind the sides flat so I hae something to get a spanner on.
 

bezerk

New member
Re: 1992 Typhoon 0539 rebuild

Re: 1992 Typhoon 0539 rebuild

the bolts on my truck appear to be rounded - not allen keyed or anything, just some round bolts with no grip on them so I am going to take an angle grinder (anyone see a theme here) and grind the sides flat so I hae something to get a spanner on.

well, you are better of with a socket wrench maybe?
 

Z SKI

Donating Member
Re: 1992 Typhoon 0539 rebuild

Re: 1992 Typhoon 0539 rebuild

the bolts on my truck appear to be rounded - not allen keyed or anything, just some round bolts with no grip on them so I am going to take an angle grinder (anyone see a theme here) and grind the sides flat so I hae something to get a spanner on.

Vice grips work well on holding the top of the rounded bolt. Hope this helps.

See ya,
 

Quickstop [UK]

Combating adversyty.
Re: 1992 Typhoon 0539 rebuild

Re: 1992 Typhoon 0539 rebuild

X2 Vise grips on one end and impact on the other:tup:

Well I tried that method and got nowhere - the bolt just kept spinning so plan B is on the cards....grind the bolt off and then replace with an M8 socket cap screw same as the lowering blocks. I don't have any to hand right now so that job will go on the back burner.

Tonight I got the ZQ8 box in the truck which wasn't such a big deal although I have yet to do the hoses or the steering shaft.

I have had a few minor snags today that were just plain annoying.

The replacement bearings I got for the idler pulley look great and seem ok and have the same part number, but how the :rant: am I supposed to get the old one out and the new one in?

DSC00047.jpg


I am going to put all the other pulleys in as well - I was going to blast and powder coat them but think they March Pulleys will be better. Just need to reign in the spendometer a little :lol:

I already mentioned the setback plates/ lowering blocks issue... :tdown:

Tomorrow I am hosting a fellow UK SyTy-er (UK Ty aka Rob) and we're going to look at dropping the engine in on Saturday. I can't wait. :D

Bezerk has sent me some stuff to help with that - cheers Rene!

One other thing of interest, has anyone ever seen the PAS sticker converted into Arabic? I found it in my door jam - the painter masked over it to keep it original - kind of neat.

DSC00048.jpg


So, engine in by Sat evening? Solid mounts, 3 first timers, 4L80E. Should be interesting!
 

Quickstop [UK]

Combating adversyty.
Re: 1992 Typhoon 0539 rebuild

Re: 1992 Typhoon 0539 rebuild

Well I nearly smashed the pulley - guess you can't just hammer out the bearings. :(

On a better note, UK Ty got here today after a 5 hour trip and we have been wrenching all day.

DSC00056.jpg


The main thrust was to prep the engine for dropping in tomorrow and working our way around my tiny British garage. It's bigger than most but still small.

I had to trim some stuff off the trans that was already seated under the car. You could say I am really into my truck :lol:

DSC00052.jpg


We got the oil lines installed after the solid ones were bent and then got the flexplate attached to the engine once off the stand and floating mid air.

I filled the TC which took ages - spilled some of my DEXRON III ATF (at $9 per litre, that's annoying) and it took ages to fill. I found that tipping it after every cupful made the bubbles escape and the approx 2l of ATF filled the TC enough to mount.

The major headache of the evening was the TC. It "seemed" to seat nicely then stuck. I recalled reading about the "wiggle, wiggle, cuss, shake" method so gave it a few more turns and it went in all the way up to 4/8 inches of depth from the bell housing.

DSC00058.jpg


Knowing from George Blake (may he soon come back to syty.net and do great things with his trans work again) that I needed 5/8" I was pretty worried, especially as the flexplate was sticking out 7/8"!

DSC00059.jpg


I| then worried I had the right TC/trans etc etc...

One final stab at it and voila!

DSC00060-1.jpg


TC seated properly. It's 3am now and we have only just hit the sack. Engine dropping in later today!

So I plan to take this:

DSC00053.jpg


and put it in this tomorrow :tup:

DSC00054.jpg
 

Quickstop [UK]

Combating adversyty.
Re: 1992 Typhoon 0539 rebuild

Re: 1992 Typhoon 0539 rebuild

One thing - the TC had some ridges keyed into the snout of it - are these obscured by some kind of weather seal on the end of the trans? The TC disappeared into it a lot more than I was expecting.

DSC00057.jpg


Thankfully from seating TC to actually seeing it fit properly only involved about 5 min of speculation and only 30 seconds or so of fiddling with it. Being able to sit IN the engine bay really helped.

I tried turning the trans in the various gears and with the TC on it was very easy but without it it wouldn't move - just too much torque required on that small shaft. It moved freely at the rear as well so all seems good. My next post should see me with an engine in the truck :D
 

Quickstop [UK]

Combating adversyty.
Re: 1992 Typhoon 0539 rebuild

Re: 1992 Typhoon 0539 rebuild

So,

made a LOT of progress in the last week :D

DSC00061.jpg


DSC000661.jpg


The engine is in the truck but currently one of the motor mounts is missing. I got two of the same.

DSC000631.jpg


I have spoken to the vendor and got another one on the way free of charge - great customer support. In the meantime I had to wait for a few things but loads of stuff happened today.

Last weekend we dropped the motor in and I have been messing around with odd jobs as I wait for a few things:

I am very pleased I found the 90 degree fitting for the oil return. It has Aeroquip markings on it - anyone seen replacements anywhere?

A- Arms and stock coilovers - grinding but not installed as I need some washers.

DSC00128.jpg


Has anyone got any experience with the camber of the front wheels?

DSC00127.jpg


The keys look nigh on impossible to adjust once the coilovers are in there. Could you weld one end of the key so it was flush?

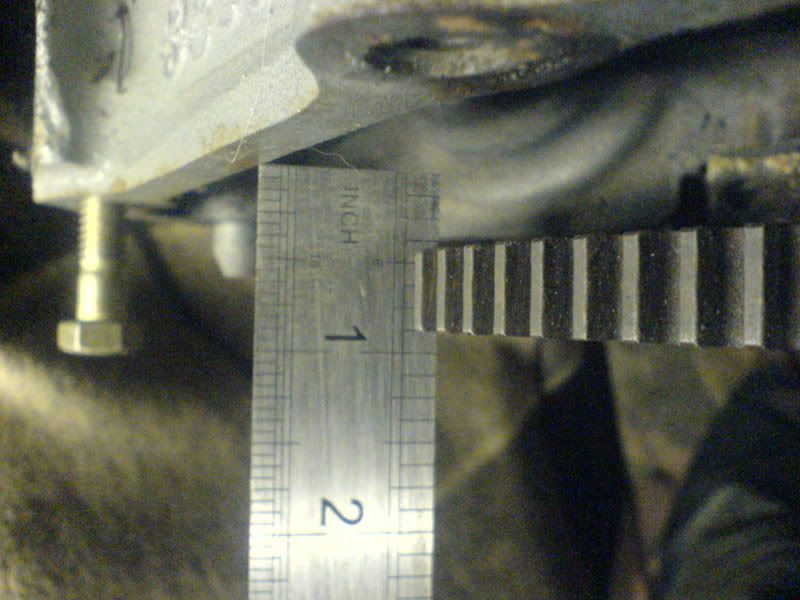
Turbo - biggest headache of all so far. I tried fitting it a few weeks back and got nowhere. I ordered a spacer plate (5mm) but it wasn't enough. Mike Renze kindly offered to end me his 1/2" one and that arrived today, otherwise I was down for a 1" spacer from John Waller all custom CNCd...

Thankfully the spacer was thick enough. Unfortunately the holes were a tad off and too small so I had to figure out my Dad's antiquated drill press. After getting a new cobalt M10 HSS tip I was able to make short work of it but all the running around took me all day eventually.

DSC00070.jpg


DSC00071-1.jpg


I got back from the gym and tried test fitting it but the holes were slightly off so I resorted to my favourite trick; grinding. This time though it was with the hand file :(

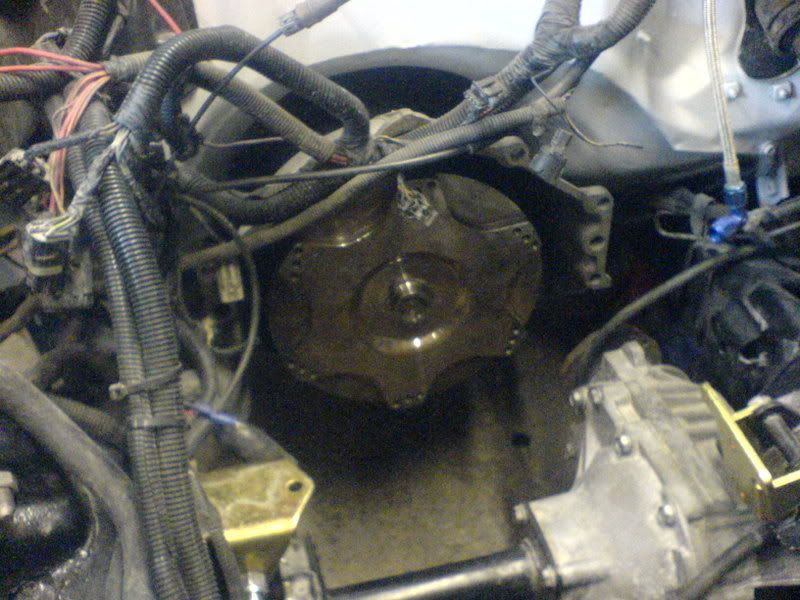
I got it fitted and it is in the truck. I was going for a test fit before I applied the copper ultra RTV but I'm just going to leave it for now and see what happens.

As you can see, even with a 1/2" spacer, it requires substantial grinding of the bracket. I reclocked the turbo to give me some more room but it is still very tight. It clears though and my truck has a turbo in it again :D

DSC00073-1.jpg


DSC00132.jpg


The coolant line I got for the turbo however is too short. It might be for the ac delete package but it needs a few more inches. Installing it only ground off some paint from my nice new ac bracket :(

The fixed fuel lines that were attached to the trans proved to be a pain in the ass and I decided just to replace them with some nitrile hoses so I sent off the hose ends to a shop and should get them back in a few days.

I also fit some coolant sensors - no big deal.

I was going to install the RPM inline turbo filter but wanted to quickly check. Is this the correct place and do I remove the blanking plug?

DSC00131.jpg


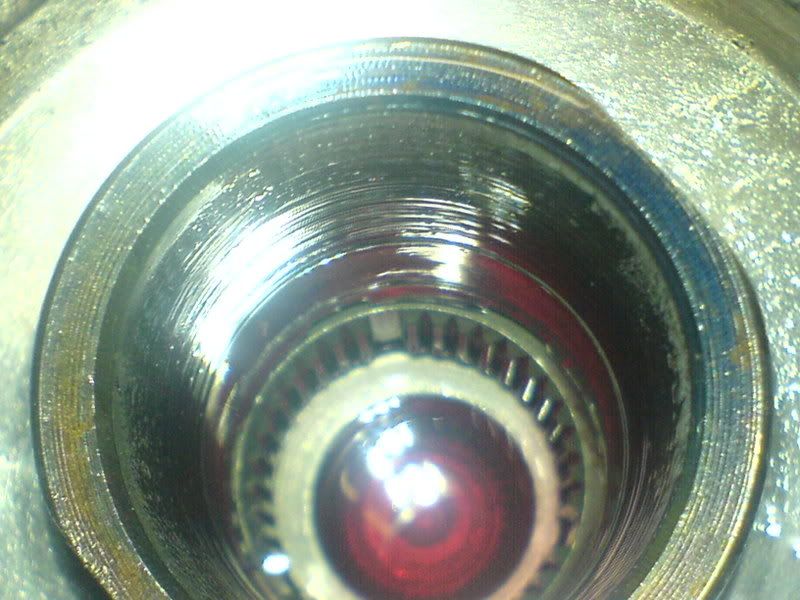
what is the name of the tool? It is a square drive but not the same as my sockets (typical).

I still need to wire up the 80E into the stock harness and connect the shifter linkage and install all the c-clips. I want to get all the wiring done first though and am sort of thinking of leaving it until the truck is running so I can see if it all ties in.

I need to do my battery relocate - I have the Taylor kit - could someone please post pics of theirs? I'd like to put it in the boot unless there is a clever under-body solution?

The valve covers are off tomorrow for powdercoating grey the same as the block and I need to get some brackets painted and reinstalled.

I also posted w hile back about the steering lock not working. I didn't know that you can adjust the angle of the column (shows how much I drove it before diving into this project) and when I messed around wiht it and then out the keys in, whatever crap was causing the steering lock to act up must have been shifted. Steering column works perfectly!

Lots happening right now :D. I know it isn't running yet but I am in the garage all day every day apart from every second weekend and I amreally enjoying working on this truck. I feel like I am close.

Hope you guys enjoy reading this :D
 
Top